
Cross-page relevance
To enhance user experience, increase engagement, and drive conversions, ASAP provides the cross-page relevance feature. This functionality creates seamless connections between content on different pages, enabling intuitive navigation. This document provides a comprehensive overview of how to implement this feature by configuring spaces and creating delivery tasks.
Basic concepts
Terms | Definition | Sample image |
Badge | A static graphic element displayed as an icon in the top-right corner of an image or text, designed to catch users' attention and encourage clicks. |
|
Badge Space | The space for displaying badges. For example, the area above the Finance (理财), Lifestyle (生活), and Offers (优惠) tabs can be seen as a badge space. Please note that the badge space is an independent area and is not related to the tabs below. |
|
Badge Position | The specific position of a badge within a badge space. Multiple badges can be placed within a single badge space. There are two types of badge positions: Static Position and Dynamic Service Position. | |
Static Position | In a wallet app, certain products such as Finance (理财), Lifestyle (生活), and Offers (优惠) tabs always appear in specific locations. Badges can be placed in the top right corner of these tabs. To ensure badges appear correctly, their positions can be linked to the respective products on these tabs. In the provided example, there are three static badge positions corresponding to Finance, Lifestyle, and Offers. |
|
Dynamic Service Position | In a wallet app, certain services do not have a fixed display order, which means they may not always appear in the same location. As a result, the badge positions corresponding to these services are referred to as Dynamic Service Positions. |
|
Landing Position | The area where content related to the previous page is displayed. This location can be either a display space or a custom position in the wallet. | |
Display Space (Position) | A type of landing position that uses existing display spaces created in ASAP. | |
Custom Position | A type of landing position that uses display spaces created outside of ASAP, requiring technical specifications to define the position (e.g., the badge positions for Scenic Spots (景点) or eSIM in the sample image). |
|
Source | The starting point of the user journey, used to expose content and drive navigation to the next page.
|
|
Landing | The receiving point after the user leaves the Source, used to continue the intent and deliver the experience.
|
|


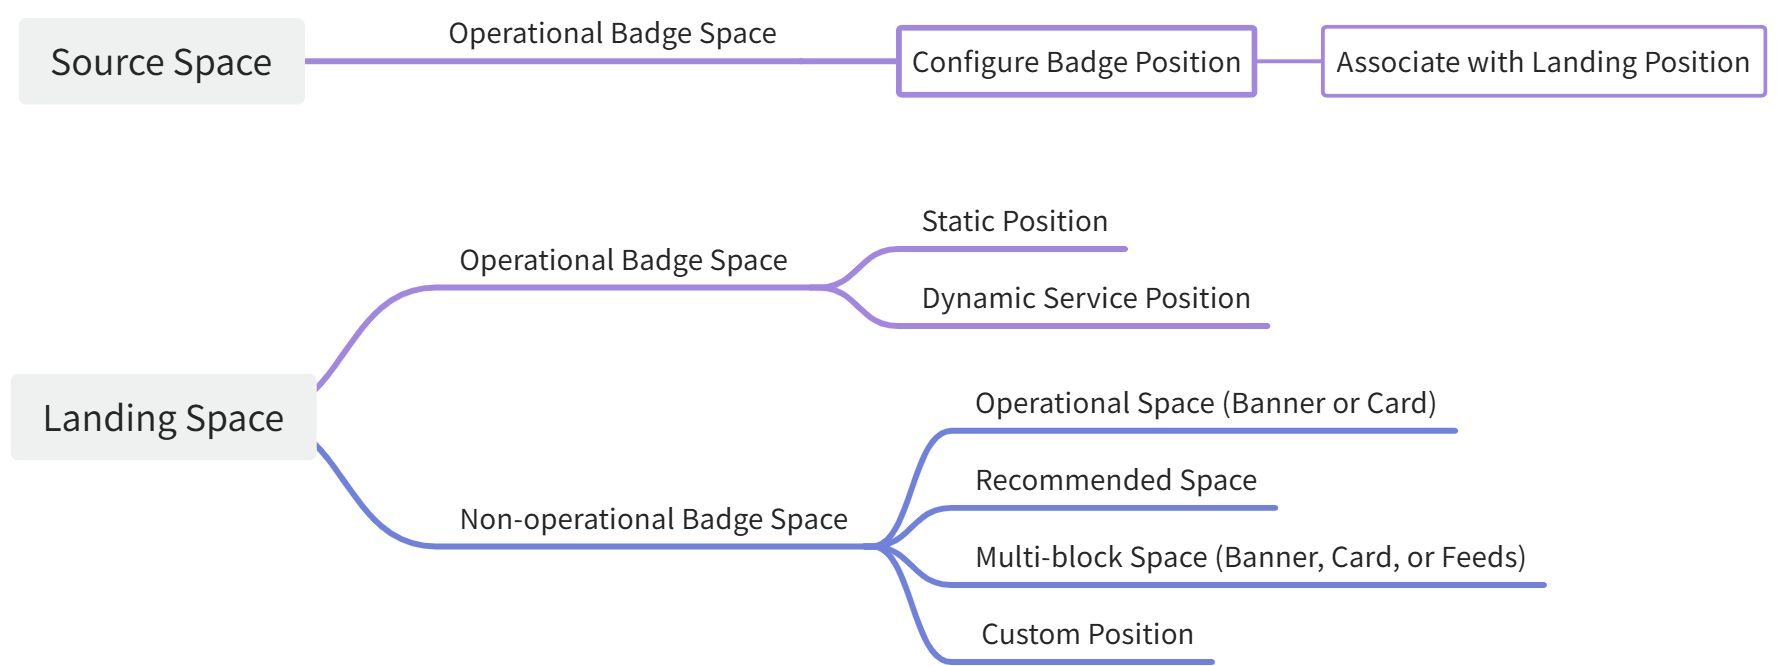
Operational badge spaces can serve as either Source Space or Landing Space. However, operational banner and card spaces, as well as recommended spaces, can only serve as Landing Space. Refer to the following diagram to see the roles that different types of display spaces can fulfill.
Before configuring Cross-page Relevance for a task in a badge space, you must complete the Badge Settings, which are predefined in Space Management.
Configure space
The following section introduces the configuration details for the badge space.
Badge position
- Navigate to Assets > Space Management > Space Settings, and click Create Space.

- For the Space Type field, select Badge. For settings in other fields, refer to Create a display space.

- If you want this space to serve as Source Space or Landing Space, check the appropriate options as needed. If you select Source Space, you must also configure its landing position.

- Select a badge position type: Static Position or Dynamic Service Position. Refer to the next section for details.
Static position
If you select Static Position, refer to the following table for the required configuration items:
Field name | Description |
Position Name | The unique name of the badge position, up to 50 characters. It is recommended to use the specific product name. For example, if a badge position is related to the "Ride Hailing (Call 车)" product, name it "Ride Hailing (Call 车)" to help operators easily identify it.
|
Position Code | The unique code of the badge position. |
Position Description | The description of the badge position, up to 200 characters. |
Associated Landing Position | The landing position type, which has two options:
|
Actions | Click Add Badge Position to configure up to 10 positions. Existing positions can be edited or deleted as needed. |


Dynamic service position
If you select Dynamic Service Position, refer to the following table for the required configuration items:
Field name | Description |
Service Scope | Defines the scope of the services.
When creating a delivery task using this badge space, you must first select a badge position (角标落点). The service range you specify here will be displayed in the badge position selection area, but it is for reference only and can be adjusted as needed.
|

Display rules
Badge spaces only support using templates to establish display rules.

We provide the following three templates for you to choose from:
Template name | Attributes |
Regular Badge (常用角标) |
|
Badge (Customizable Color) 角标(可配颜色) |
|
Red Dot (红点) | Badge Position Name (maximum 521 characters) |
Configure badge
Navigate to Traffic > Intelligent Delivery > Operational Space, select a badge space, and click Create Task to open the creation page. Scroll down to the Badge Settings section.


Static position
If the badge space was created with the badge position type set to Static Position, you can directly select a previously configured badge position from the dropdown options.

Dynamic service position
If the badge space was created with the badge position type set to Dynamic Service Position, click Select. A pop-up will display the previously configured service range. You can edit existing entries and add new ones. Choose one from the filtered results and click Submit.


Configure cross-page relevance
The cross-page relevance settings ensure that Source Content and Landing Content are aligned, so users can find the expected content after navigation. Take "Transportation 10% off voucher" as an example:
- Source: Add a “10% off” badge to the Transportation service entry on the wallet homepage.
- Landing: On the Transportation landing page, highlight the 10% off voucher in the voucher section.
This creates a clear linkage between the badge and the voucher, ensuring a consistent and coherent user experience.
Refer to the following section for how to configure cross-page relevance:
Navigate to Traffic > Intelligent Delivery > Operational Space. Select a badge space and click Create Task.

Six types of cross-page relevance are supported:
- Badge to badge (static position)
- Badge to badge (dynamic service position)
- Badge to banner/card
- Badge to recommended space
- Badge to custom position
- Multi-positions
The following examples demonstrate how to configure these types.
Badge to badge (static position)
When users click the transportation service displaying the "100" badge text, they will be directed to the transportation channel. Here, users can view the Ride Hailing (Call车) service with the same badge text for a consistent user experience.
In this example, the badges for Transportation (交通) and Ride Hailing (Call车) are both static positions.
To achieve this effect, take the following steps:

- In the Badge Position (角标落点) field, select Transportation (交通) and set the badge text to "100".

- Scroll down to the Cross-page Relevance section, click Add. In the pop-up, select Display Space as the landing position type and choose a badge space (e.g., 投承升级-承接角标) under the Operational Spaces tab. Then, click Next.


- Choose a badge position within this space. In this example, select Ride Hailing (call 车). There is no need to configure the badge text, as the landing position will automatically inherit the badge text from the source page.

- View the configuration details under Cross-page Relevance.

For this type of cross-page relevance, refer to the following table for field descriptions:
Field name | Description |
Content/Badge Position Name | The name of the landing position, which in this context refers to the name of a badge position. |
Content/Badge ID | The unique identifier assigned to the badge position. |
Landing Position Type | The type of landing position, which is Display Space in this context. |
Landing Position | The name of the display space. |
Actions | Options to edit and delete the entry. |
Badge to badge (dynamic service position)
A user clicks the Ride Hailing (Call车) service and is redirected to its detail page, where Exclusive Offer (独家优惠) is displayed with the same badge text.
In this example, the badge for Ride Hailing (Call车) is a static position, while the badge for Exclusive Offer (独家优惠) is a dynamic service position.
To achieve this effect, take the following steps:

- In the Badge Position (角标落点) field, select Ride Hailing (Call 车) and set the badge text to "100".

- Scroll down to the Cross-page Relevance section, click Add. In the pop-up, select Display Space as the landing position type and choose a badge space (e.g., 投承升级-承接服务) under the Operational Spaces tab. Then, click Next.

- Choose a badge position within this space. If the selected space's badge position type is Dynamic Service Position, the pop-up will display a previously-configured service scope for you to select, which can be adjusted as needed.

- View the configuration details under Cross-page Relevance.

For this type of cross-page relevance, refer to the following table for field descriptions:
Field name | Description |
Content/Badge Position Name | The name of the landing position, which in this context refers to the name of a service. |
Content/Badge ID | The unique identifier assigned to the service. |
Landing Position Type | The type of landing position, which is the display space in this context. |
Landing Position | The name of the display space. |
Actions | Options to edit and delete the entry. |
Badge to banner/card
A user clicks the transportation service displaying the "20% off (8折)" badge text and is redirected to its detail page, where a 20% off banner is displayed.
In this example, the badge for Transportation (交通) is a static position, while the 20% off promotional banner is displayed in a banner space.
To achieve this effect, take the following steps:
- In the Badge Position (角标落点) field, select Transport (交通) and set the badge text to "20% off (8折)".

- Scroll down to the Cross-page Relevance section, click Add. In the pop-up, select Display Space as the landing position type and choose a banner space (e.g., 首页banner样式A展位) under the Operational Spaces tab. Then, click Next.

- Select a specific delivery task as the landing position content and then click Submit.

- View the configuration details under Cross-page Relevance.

For this type of cross-page relevance, refer to the following table for field descriptions:
Field name | Description |
Content/Badge Position Name | The name of the landing position, which, in this context, refers to the name of a delivery task. |
Content/Badge ID | The unique identifier assigned to the delivery task. |
Landing Position Type | The type of landing position, which is the display space in this context. |
Landing Position | The name of the display space. |
Actions | Options to edit and delete the entry. |
Badge to recommended space
A user clicks the Ride Hailing (call 车) service displaying the "100" badge text and is redirected to its detail page, where a 100 CNY transportation voucher is displayed.
In this example, the badge for Ride Hailing (Call车) is a static position, while the 100 CNY transportation voucher is displayed in the recommended space.
Note: If the landing position is a recommended space, the system displays only the content from that space; the source badge text is not overlaid on the landing content.
To achieve this effect, take the following steps:

- In the Badge Position (角标落点) field, select Ride Hailing (call 车) and set the badge text to "100".

- Navigate to the Cross-page Relevance section, click Add. In the pop-up, select Display Space as the landing position type and choose a recommended space (e.g., 投承升级-推荐位). Then, click Next.

- Select a specific landing content in the recommended space. You can choose either a static creative or a content collection. Then, click Submit.

- View the configuration details under Cross-page Relevance.

For this type of cross-page relevance, refer to the following table for field descriptions:
Field name | Description |
Content/Badge Position Name | The name of the landing position, which, in this context, refers to the name of a static creative or content collection. |
Content/Badge ID | The unique identifier assigned to the static creative or content collection. |
Landing Position Type | The type of landing position, which is the display space in this context. |
Landing Position | The name of the display space. |
Actions | Options to edit and delete the entry. |
Badge to custom position
A user clicks Travel+ with a badge text of "FLIGHT" and is redirected to Voyager, where the Voyager flight services are displayed.
In this example, the badge for Travel+ is a static position, while the badge for Voyager is a custom position.
To achieve this effect, take the following steps:

- In the Badge Position (角标落点) field, select travel and set the badge text to "flight".

- Scroll down to the Cross-page Relevance section, click Add. In the pop-up, select Custom Position as the landing position type and choose a specific position. Then, click Next.
 3. Configure content for this landing position. The content to be filled out here is a technical protocol that includes the positioning of the "Flight" tab and badge text.

- View the configuration details under Cross-page Relevance.

For this type of cross-page relevance, refer to the following table for field descriptions:
Field name | Description |
Content/Badge Position Name | The name of the landing position, which in this context refers to the name of the landing content. |
Content/Badge ID | The name of the custom landing position. |
Landing Position Type | The type of landing position, which is the Custom Position in this context. |
Landing Position | The name of the landing position. |
Actions | Options to edit and delete the entry. |
Multi-positions
ASAP supports interconnecting up to four positions, creating up to three levels of relevance:
- Level 1: Link between position 1 (source) and position 2 (landing).
- Level 2: Link between position 2 and position 3.
- Level 3: Link between position 3 and position 4.
To configure a second landing position, click Add Second Landing Position in the landing position list.

The configuration process is the same as for the first-level relevance. After setup, you can return to the list to view the details for each landing position.

Note:
- The Add Second Landing Position button will appear only when the first landing space also serves as a source space.
- If all landing positions (levels 1–3) are badge spaces, you only need to set the text for the first badge. Subsequent badges will automatically inherit and display the same text as the first badge.