
Tag management
Tag management provides a centralized module to configure and manage tags. These tags are then used for tagging supplies, helping you efficiently categorize, search, and deliver content based on specific themes or characteristics.
Before you start
Before creating tags, familiarize yourself with the two dimensions of tag categorization:
- Tag Administration: Defines who manages the tag.
- Centralized Tags: Managed by the ASAP Admin.
- Custom Tags: Managed by the wallet tenant.
- Tag Source: Defines how tags are generated.
- Algorithmic Tags: Automatically applied by an AI model or algorithmic models.
- Statistical Tags: Automatically applied based on data processing.
- Manual Tags: Applied manually by users.
- API Tags: Applied to content via API.
The available Tag Source depends on the selected Tag Administration:
- Centralized Tags management supports Algorithmic and Statistical tags.
- Custom Tags management supports Statistical, Manual, and API tags.
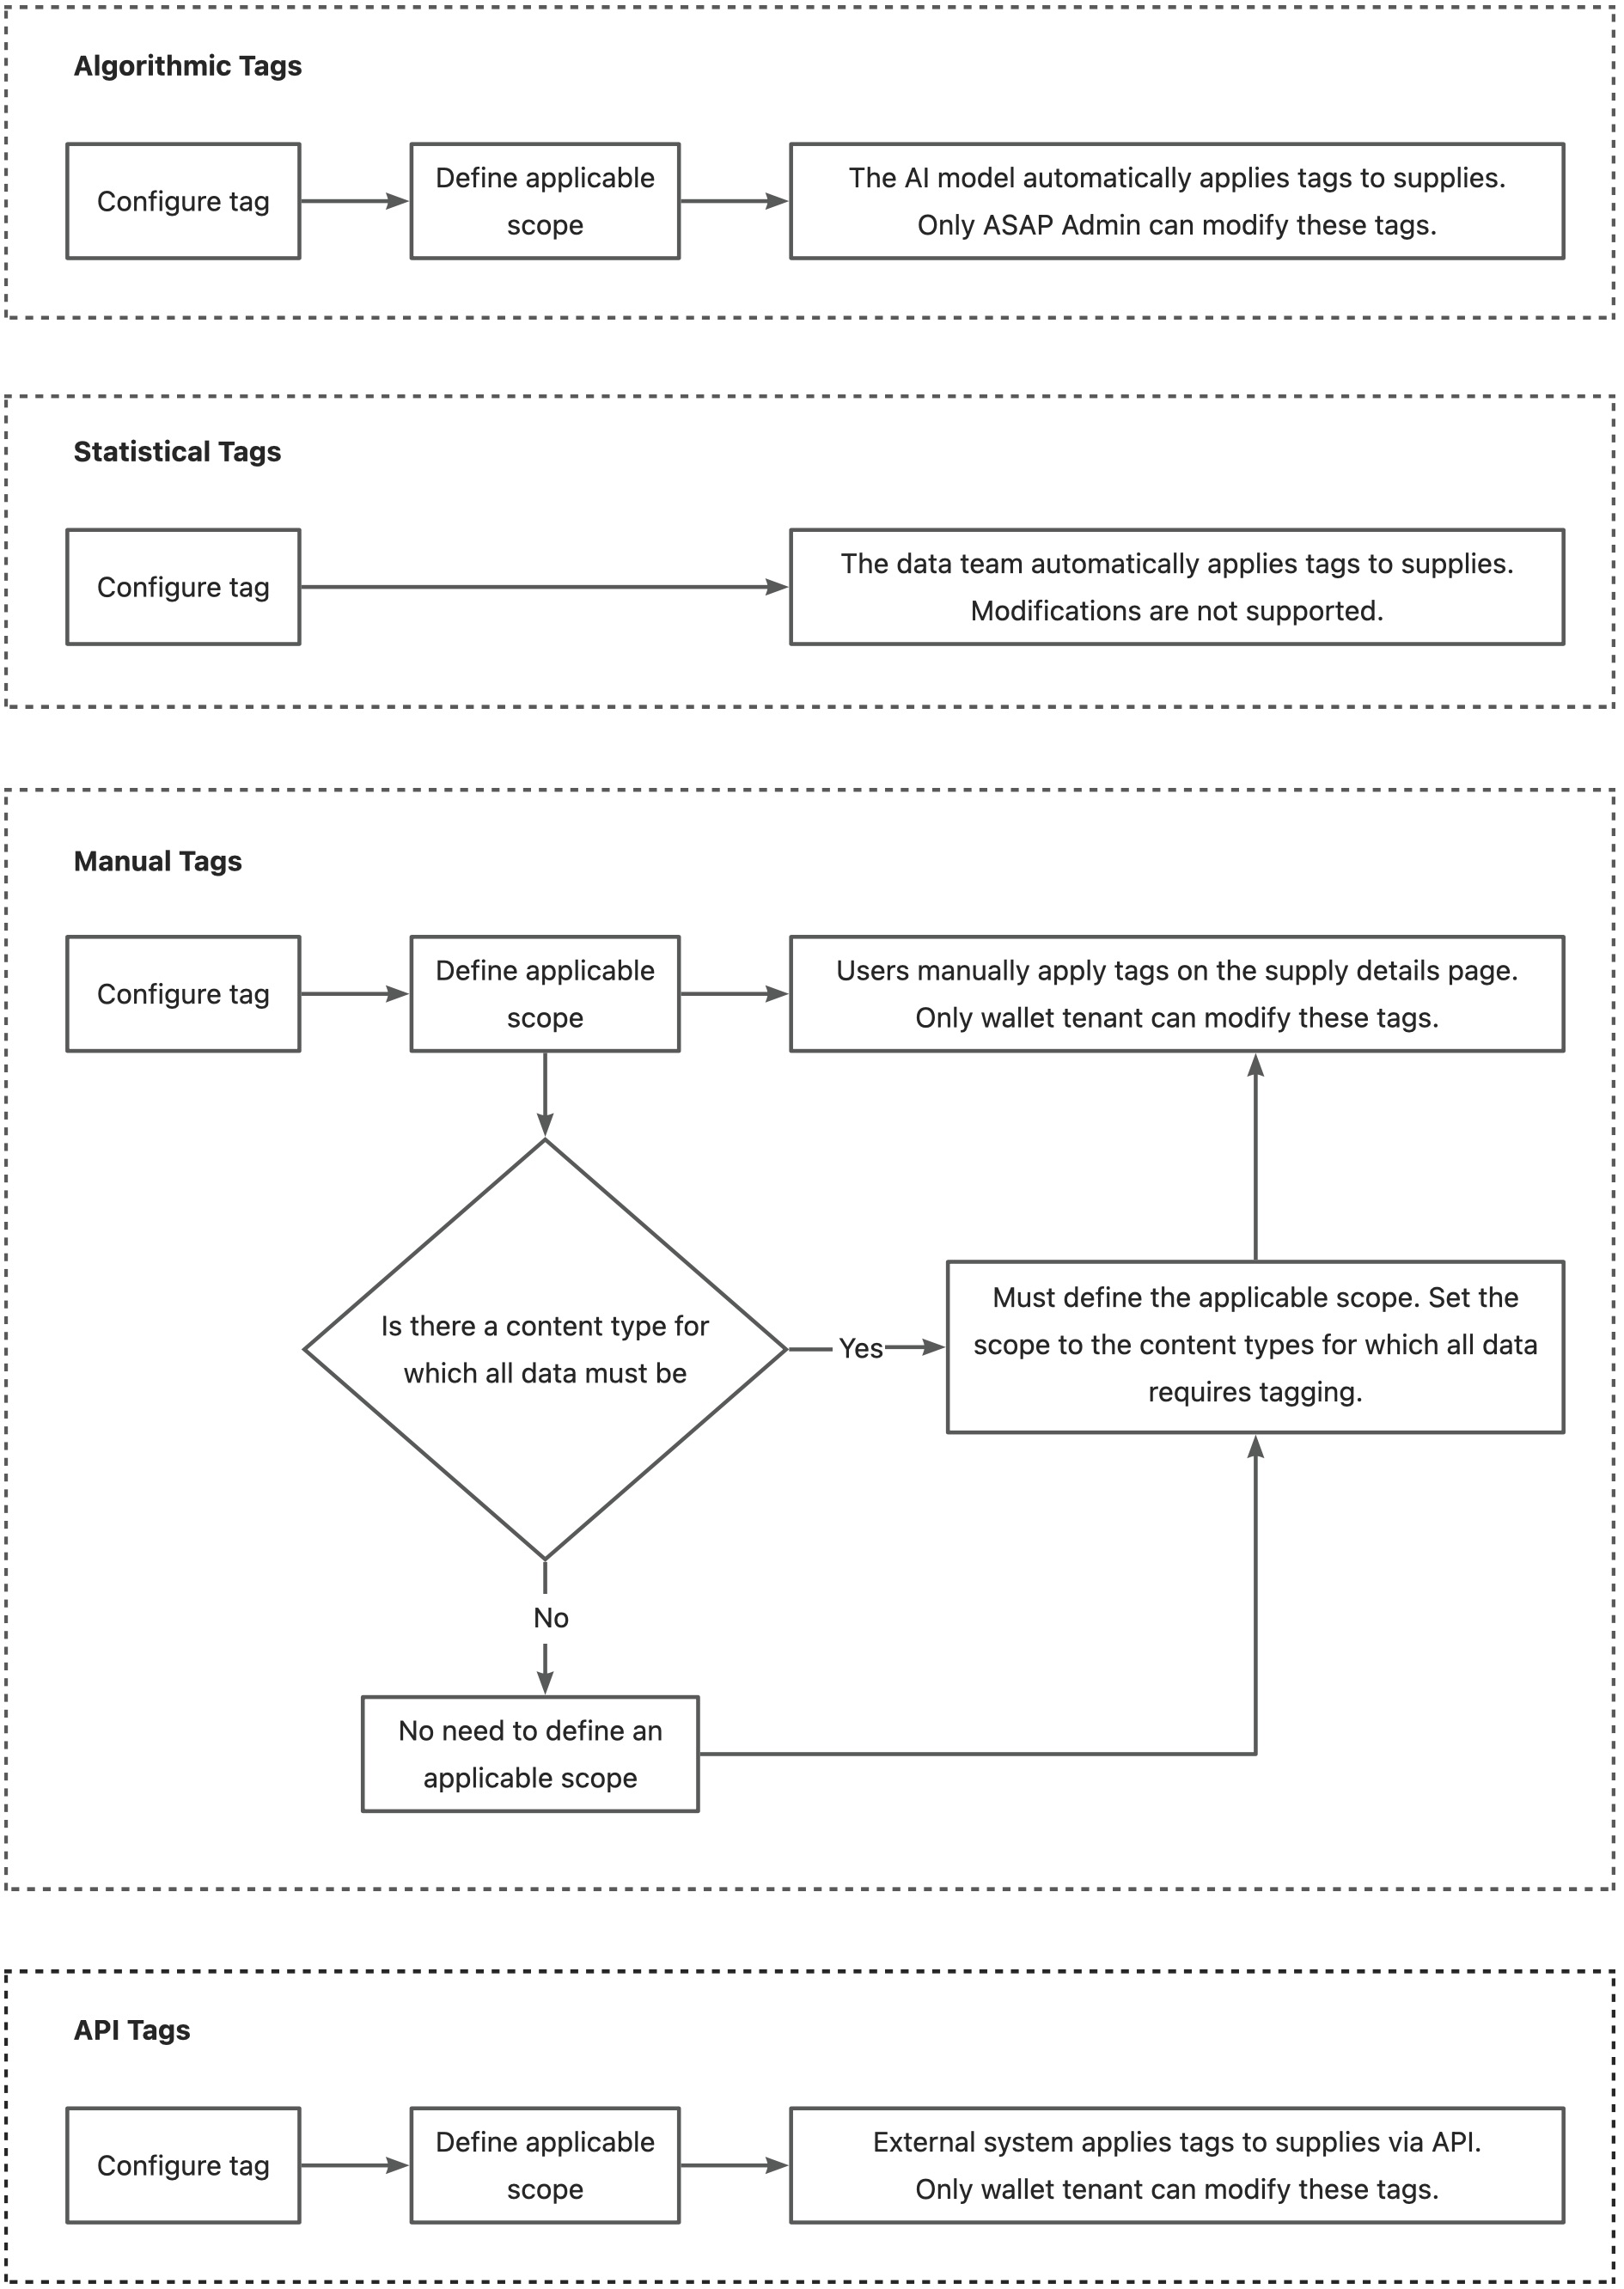
Refer to the following chart for the workflow of the different tag sources:
Manage tag list
Navigate to Asset > Supply Management > Tag Management. The displayed tag list depends on your wallet:
- Alipay+ Wallet: Displays all Centralized Tags and Custom Tags under the Alipay+ wallet.
- Non-Alipay+ Wallets: Displays Centralized Tags and Custom Tags within the current wallet.

For the details of each field on the tag list page, refer to the following table:
Field name | Description |
Tag Code | A unique identifier for the tag. |
Tag Name | The name of the tag. |
Tag Category | The business category of the tag. |
Tag Administration | The management model of the tag, includes Centralized Tags and Custom Tags. |
Tag Source | The method by which the tag is generated, includes Manual Tags, Algorithmic Tags, Statistical Tags, and API Tags. |
Tag Value Type | The type of value the tag can hold:
|
Applicable Scope | The scope of tenants and content types where the tag can be applied. Tagging fails if the supply is outside this scope.
|
Content Collection | Determines whether this tag can be used for content selection. If enabled, this tag appears as a filter for selecting content during task delivery. |
Status | The current status of the tag:
|
Created By | The user who created the tag. |
Created At | The time when the tag was created. |
Last Edited At | The most recent time the tag was edited. |
On the tag list page, you can perform the following actions for each tag:
Action | Description |
Detail | Click to open the Tag Details page to view all information about the tag. You can view the tag and tag value information on the details page.
|
Edit | Click to open the Tag Settings page to modify the tag configuration. |
Manage Scope | Click to open the Manage applicable scope dialog. The scope settings decide how tags are applied and displayed. If you turn off the scope for a content type, the tag no longer appears on the associated supplies. |


Create and edit tag
To create a tag, navigate to Asset > Supply Management > Tag Management and click Create Tag in the top-right corner. To edit a tag, click Edit in the Actions column.

The subsequent steps vary depending on the selected Tag Source.
Algorithm tags
Note: Algorithmic tags are always Centralized Tags. Only ASAP Admins can create, edit, or apply them to supplies.
Step 1: Configure tag.

For instructions on how to fill in each field, refer to the following table:
Field name | Description |
Tag Administration | Defaults to Centralized Tags and cannot be edited. |
Tag Source | Select Algorithmic Tag. This field cannot be edited after created. |
Tag Name | Enter a name up to 100 characters. Supports both Chinese and English. |
Tag Code | Enter a unique code up to 100 characters. Supports English letters, numbers, and underscores (_). This field cannot be edited after it is created. |
Content Collection | Optional and can be edited. Select Yes to make this tag available as a filter during task delivery; otherwise, select No. |
Tag Category | Select a category that best fits the application scenario. |
Display Area | Specify which tenants can view this tag. Centralized tags are visible only in the wallets that are included in the specified display area. |
Tagging Content Types | Defines the content types that Algorithmic Tags will be applied to. Only content types under the wallets configured in Display Area can be selected. |
Tagging Party | Defaults to ASAP Platform and cannot be edited. |
Tag Description | Input a prompt to be used by the AI model. To see prompt examples, click Prompt Reference. |
After filling in the required information, click Next to proceed to the tag value configuration page. Alternatively, click Cancel to discard the changes.
Step 2: Configure tag value.

For instructions on how to fill in each field, refer to the following table:
Field name | Description |
Tag Value Type | This field is required and cannot be edited after configuration. Select the tag value type that best fits your needs:
|
Tag Value Code | Required for Single Selection and Multiple Selection tag value types. Enter a unique code up to 100 characters. Supports only English letters, numbers, and underscores (_). This field cannot be edited after created. |
Language | Required for Single Selection and Multiple Selection tag value types. Select a supported language, then enter the corresponding tag value. Click the + icon to add a new language value, and click the - icon to delete a language tag value. Deleted language values will no longer appear on the supply details page.
|
Number Range | Available when the tag value type is Numbers. Set a number range for valid tagging:
|
Tag Value Language | Available when the tag value type is Multilingual Text. Select all languages that the text value should support. Click the + icon to add a new language, and click the - icon to delete a language. Deleted language will no longer appear on the supply details page.
|
Add Value | Available when the tag value type is Multiple Selection. Click to add a new enumerated tag value. |


You can click Activate or Deactivate beside each tag value to enable or disable it. Deactivated tag values will no longer appear on the supply details page.

Click Save to finalize the tag creation after completing all required fields.
Brand tags and attraction tags
Attraction tags and brand tags are two special types of Algorithmic Tags. They are created by the system with predefined tag values.
Tag Settings
Attraction tags and brand tags are system-created tags. ASAP Admin can edit them, and the editable fields are the same as for other Algorithmic Tags, including Tag Name, Enable Content Collection, Tag Category, Display Area, Tagging Content Types.
Tag Value Settings
The tag values for attraction tags and brand tags are system-defined, and the Tag Value Type is Multiple Selection.
- For attraction tags, the tag value list shows the Standard Attraction Name and Attraction Name.

- For brand tags, the tag value list shows the Standard Brand Name and Brand Name.


No additional configuration is required for tag values. Click Save to complete the editing.
Statistical tags
Note: Statistical tags can be either Centralized Tags or Custom Tags, depending on which user role creates the tag.
Step 1: Configure tag.

For instructions on how to fill in each field, refer to the following table:
Field name | Description |
Tag Administration |
|
Tag Source | Select Statistical Tags. This field cannot be edited after created. |
Tag Name | Enter a name up to 100 characters. Supports both Chinese and English. |
Tag Code | Enter a unique code up to 100 characters. Supports English letters, numbers, and underscores (_). This field cannot be edited after it is created. |
Tag Category | Select a category that best fits the application scenario. |
Display Area | Specify which tenants can view this tag.
|
Tagging Content Types | Specify the data scope for tagging. Only content types under wallets in the Display Area field can be selected. |
Tagging Party | Defines who can apply the tag.
|
Tag Description | Enter a general description of the tag. |
After filling in the required information, click Next to proceed to the tag value configuration page. Alternatively, click Cancel to discard the changes.
Step 2: Configure tag values.
For instructions on how to fill in each field, refer to the following table:
Field name | Description |
Tag Value Type | This field is required and cannot be edited after configuration. Select the tag value type that best fits your needs:
|
Tag Value Code | Required for Single Selection and Multiple Selection tag value types. Enter a unique code up to 100 characters. Supports only English letters, numbers, and underscores (_). |
Language | Required for Single Selection and Multiple Selection tag value types. Select a supported language, then enter the corresponding tag value. Click the + icon to add a new language value, and click the - icon to delete a language tag value. Deleted language values will no longer appear on the supply details page.
|
Number Range | Available when the tag value type is Numbers. Set a number range for valid tagging:
|
Tag Value Language | Available when the tag value type is Multilingual Text. Select all languages that the text value should support. Click the + icon to add a new language, and click the - icon to delete a language. Deleted language will no longer appear on the supply details page.
|
Add Value | Available when the tag value type is Multiple Selection. Click to add a new enumerated tag value. |
You can click Activate or Deactivate beside each tag value to enable or disable it. Deactivated tag values will no longer appear on the supply details page.
Click Save to finalize the tag creation after completing all required fields.
Manual tags
Note: Manual tags are always Custom Tags. Only the wallet operator can create, edit, or apply them to supplies.
Step 1: Configure tag.

For instructions on how to fill in each field, refer to the following table:
Field name | Description |
Tag Administration | Defaults to Custom Tags and cannot be edited. |
Tag Source | Select Manual Tag. This field cannot be edited after created. |
Tag Name | Enter a name up to 100 characters. Supports both Chinese and English. |
Tag Code | Enter a unique code up to 100 characters. Supports English letters, numbers, and underscores (_). This field cannot be edited after it is created. |
Content Collection | Optional and can be edited. Select Yes to make this tag available as a filter during task delivery; otherwise, select No. |
Tag Category | Select a category that best fits the application scenario. |
Tagging Party | Defaults to Tenant and cannot be edited. |
Mandatory | This field is required but can be edited. Select Yes if this tag is a required field for the supply; otherwise, select No. |
After filling in the required information, click Next to proceed to the tag value configuration page. Alternatively, click Cancel to discard the changes.
Step 2: Configure tag value.
For instructions on how to fill in each field, refer to the following table:
Field name | Description |
Tag Value Type | This field is required and cannot be edited after configuration. Select the tag value type that best fits your needs:
|
Tag Value Code | Required for Single Selection and Multiple Selection tag value types. Enter a unique code up to 100 characters. Supports only English letters, numbers, and underscores (_). This field cannot be edited after created. |
Language | Required for Single Selection and Multiple Selection tag value types. Select a supported language, then enter the corresponding tag value. Click the + icon to add a new language value, and click the - icon to delete a language tag value. Deleted language values will no longer appear on the supply details page.
|
Number Range | Available when the tag value type is Numbers. Set a number range for valid tagging:
|
Tag Value Language | Available when the tag value type is Multilingual Text. Select all languages that the text value should support. Click the + icon to add a new language, and click the - icon to delete a language. Deleted language will no longer appear on the supply details page.
|
Add Value | Available when the tag value type is Multiple Selection. Click to add a new enumerated tag value. |
You can click Activate or Deactivate beside each tag value to enable or disable it. Deactivated tag values will no longer appear on the supply details page.
Click Save to finalize the tag creation after completing all required fields.
API tags
Note: API tags are always Custom Tags. Only the wallet operator can create, edit, or apply them to supplies.
Step 1: Configure tag.

For instructions on how to fill in each field, refer to the following table:
Field name | Description |
Tag Administration | Defaults to Custom Tags and cannot be edited. |
Tag Source | Select API Tags. This field cannot be edited after created. |
Tag Name | Enter a name up to 100 characters. Supports both Chinese and English. |
Tag Code | Enter a unique code up to 100 characters. Supports English letters, numbers, and underscores (_). This field cannot be edited after it is created. |
Enable Content Collection | Optional and can be edited. Select Yes to make this tag available as a filter during task delivery; otherwise, select No. |
Tag Category | Select a category that best fits the application scenario. |
Target Supply | Defines the content types that API Tags will be applied to. |
Tagging Party | Defaults to Tenant and cannot be edited. |
After filling in the required information, click Next to proceed to the tag value configuration page. Alternatively, click Cancel to discard the changes.
Step 2: Configure tag value.

For instructions on how to fill in each field, refer to the following table:
Field name | Description |
Tag Value Type | This field is required and cannot be edited after configuration. Select the tag value type that best fits your needs:
|
Tag Value Code | Required for Single Selection and Multiple Selection tag value types. Enter a unique code up to 100 characters. Supports only English letters, numbers, and underscores (_). This field cannot be edited after created. |
Language | Required for Single Selection and Multiple Selection tag value types. Select a supported language, then enter the corresponding tag value. Click the + icon to add a new language value, and click the - icon to delete a language tag value. Deleted language values will no longer appear on the supply details page.
|
Number Range | Available when the tag value type is Numbers. Set a number range for valid tagging:
|
Tag Value Language | Available when the tag value type is Multilingual Text. Select all languages that the text value should support. Click the + icon to add a new language, and click the - icon to delete a language. Deleted language will no longer appear on the supply details page.
|
Add Value | Available when the tag value type is Multiple Selection. Click to add a new enumerated tag value. |
You can click Activate or Deactivate beside each tag value to enable or disable it. Deactivated tag values will no longer appear on the supply details page.
Click Save to finalize the tag creation after completing all required fields.
Tag supply
Centralized tags
Navigate to Asset > Supply Management > Supply List, select a supply, and click Edit Tags to open the details page.

In the System Tags section, select the tag you want to edit, then click Edit Tag in the top-right corner.

In the tag editing dialog, update the tag values and click Save to complete the centralized tag editing.

Custom tags
Navigate to Asset > Supply Management > Supply List, select a supply, and click Details.

Edit tag
On the detail page, navigate to the Tag Info section, select one or more tags in the Custom Tags (Manual), then click Edit Tag.
In the Edit Custom Tags dialog, modify the tag values, and click Save.

You will return to the details page, where the edited tags will appear at the top and be marked as Edited.

Select the tags and click Submit to apply the changes:
- An approval request will be initiated if tag changes for this content type require approval, and the changes will take effect once approved.
- Changes will take effect immediately if tag changes for this content type do not require approval.
Note:
- The approval flow Keywords & Custom Tag Edit must be configured in advance.
- Tags that are under approval cannot be edited. Their checkboxes are disabled and display the message This tag is under review and cannot be edited.
- Statistical and API tags can only be edited in the external system. The Custom Tags (System) section is read-only.
Add tag
In the Tag Info section, click Add Tag.

In the Add Custom Tags dialog, enter the Tag Name or Tag Code to search for the tags you want to add. After selecting a tag, enter the corresponding Tag Value. Click Add Tag to add multiple tags if needed.

Once all tags are entered, click Save to return to the details page. All newly added tags will appear at the top and be marked as New.

Select the tags and click Submit to apply the changes:
- An approval request will be initiated if tag changes for this content type require approval, and the changes will take effect once approved.
- Changes will take effect immediately if tag changes for this content type do not require approval.
Note:
- The approval flow Keywords & Custom Tag Edit must be configured in advance.
- Only Manual Tags can be added. Statistical and API tags can only be added in the external system. The Custom Tags (System) section is read-only.
Delete tag
In the Tag Info section, specify the tag and click Delete. For tags that cannot be deleted, this action will be disabled.

Click Submit to apply the changes:
- An approval request will be initiated if tag changes for this content type require approval, and the changes will take effect once approved.
- Changes will take effect immediately if tag changes for this content type do not require approval.
Note:
- Tags that are under approval cannot be deleted. Their checkboxes are disabled and display the message This tag is under review and cannot be edited.
- If a Manual Tag is configured in the applicable scope for a content type, it cannot be deleted under that content type. Its checkbox is disabled and displays the message Default tags cannot be deleted.
- Statistical and API tags can only be deleted in the external system. The Custom Tags (System) section is read-only.
Batch add tags
ASAP allows you to add multiple tags for merchant libraries or content assets at a time. To perform batch tagging, take the following steps:
- Log in to the ASAP console.
- Navigate to the screen for batch tagging.
- To add tags for merchant libraries, go to Growth > Merchant Growth > Merchant Hub, and click Batch Add Tags on the right.

- To add tags for content assets such as services, go to Growth > Content Asset Management > Supply Management, select Service, and click Batch Add Tags on the right.

- In the Batch Add Tags dialog box that appears, click Download to download the template file, and then fill in the template file as needed.
The template file contains the following required fields:
- Content ID: the externally sourced content ID
- tag code: the tag code you entered when creating a tag
- tag value: the code of the tag value you entered when creating a tag
- Upload the modified file and click Batch Add.

During the upload, the system checks whether the filled information complies with requirements.
- If compliance is confirmed, the system starts to import the tags.
- If compliance is not met, the file upload fails, and the system prompts an error message. You can download the file to view the list of incorrect IDs or tag codes, correct them as indicated, and then re-upload the file.

- Check the import progress. If an error message appears indicating that some tags failed to be imported, you can click Retry or End Task.

- Retry: The system retries to import the failed tags.
- End Task: The system displays a "Failed to upload" message and provides a download link to a file that highlights failed tags and describes failure causes.

If the system displays a message indicating the content already has tags added:
- For tags of the Multiple Selection type: Append new tag values, replace existing tag values, skip uploading the new values, or cancel the upload.
- For tags of the Single Selection type: Replace existing tag values, skip uploading the new values, or cancel the upload.
Note: You can run only one batch tagging task at a time per wallet.